Monday, June 29, 2009

These Are a Few of My Favorite Things

I did not grow up in a household of people who liked to cook. I can imagine I will be elaborating on that in a later post (sorry mom!) so I will not say much more on that for now. I bring this up because I would like to mention there were a couple exceptions to our home's no-cooking tendencies. My dad liked to make steamed broccoli. He would steam an entire package of chopped fresh broccoli and put about a cup or two of shredded cheddar cheese on top and let it melt all over. I would eat so much broccoli. I would pile it up on my plate, sometimes eating the whole thing. When I would go to other people's houses for dinner, I noticed most people only ate a couple little trees each. Weird.

I also like chicken. Who doesn't (besides you vegetarians)? It was at a friend's house sometime around the 9th grade that I first learned of a casserole that was essentially a mix of what had become my favorite thing to eat for dinner: chicken, cheese and broccoli (along with some other delicious ingredients that only made it better). This classic casserole is called chicken divan. This is one of the first recipes I ever asked someone for after devouring it for dinner. I made it, I liked it, and I made it again. It was a pleasant surprise to me that I could simply follow a recipe and make something delicious. It was at that point I realized cooking is not hard; it simply takes patience. This recipe is so easy. I like to serve it over brown rice, but if you eat it by itself, it is another dish that you can eat on a low-carb diet. I think there are several variations of this recipe floating around, but this one is pretty much the most basic one you can make.

Why Change a Good Thing Chicken Divan:


Makes a 9" x 13" casserole dish

2 10oz packages of frozen or fresh broccoli (chopped and steamed)
4 or 5 large boneless skinless chicken breasts (cooked and shredded - about 6 or 7 C)
2 10oz cans cream of mushroom soup (condensed)
2 1/2 C shredded sharp cheddar cheese
1/2 C bread crumbs (not seasoned)
2 tbsp lemon juice
1/3 C mayonnaise
1 tsp curry powder (optional)

Pre-heat oven to 350 degrees F

In a large mixing bowl, combine the soup, lemon juice, 1 1/2 C shredded cheese, mayo, and curry powder (optional). Mix well.


Spread chopped broccoli down as the bottom layer in the glass casserole dish.
Next, layer the chicken on top of the broccoli.


Pour the soup mixture over the top of the two layers.
Sprinkle the remaining cheese and the breadcrumbs over the top.

Cover the dish with foil, and bake in the oven at 350 degrees F for 20 minutes. Remove the foil and bake for an additional 5 minutes (or until cheese starts to bubble.

Sunday, June 21, 2009

Chicken Brian

"Chicken Bryan...so yummy!!!" - a text I received from my brother, Brian, a few weeks ago after my sister-in-law made this recipe for him. It is a dish "inspired" by a meal you can order at Carrabba's Italian Grill called, well, "Chicken Bryan". So I guess when I say "inspired", what I really mean is a healthier, less-involved (but still tasty) version of exactly the same thing. Except mine is called "Chicken Brian" after my brother, father of two, wife of one, and 2nd to none.

I should also mention this recipe is an amazing option for all you low-carb dieters out there. It is very satisfying, for a (virtually) no-carb dish, if you serve it up with some grilled or steamed vegetables or a nice salad. It is also one of the easiest things I make on a regular basis. The restaurant version has it in a delicious lemon-basil-butter sauce, but I have skipped that completely simply because the dish doesn't need it and neither do your thighs.

Chicken Brian:

serves 4

4 skinless boneless chicken breasts
1 tbsp olive oil
4 oz soft goat cheese (crumbled or sliced - should be consistency of cream cheese)
1 small can of sun dried tomato paste OR small can of sun dried tomatoes (they should be in a can of olive oil, not in a dry package)
salt, black pepper, balsamic vinegar, garlic powder, and Italian seasoning to taste
Pre-heat oven to 325 degrees F
Heat olive oil in pan over med-high heat on the stove-top.
Season the chicken breasts by lightly coating them balsamic vinegar, salt, pepper, garlic powder, and Italian seasoning.
Sear each side of each chicken breast by placing them on the heated pan for about 30 seconds on each side
Place chicken breasts on a baking sheet and put them in the pre-heated oven for 15 minutes.
Remove chicken from oven and turn the heat up to broil.
Generously smear the sun dried tomato paste (or you can put 3 or 4 sun dried tomatoes, halved)on top of each chicken breast (keeping them on the baking pan)
Generously sprinkle the goat cheese crumbles on top of the sun dried tomato (or you can put two or three slices on top)
Stick the pan with the chicken breasts back into the oven under the broiler for another 5 minutes or until the cheese starts to slightly toast.


This one in the picture was made with the crumbled goat cheese and the bottled halved sun dried tomatoes. If you use the paste, it should coat the entire chicken breast.

Wednesday, June 17, 2009

Time Travel and Introductions

I have always liked the idea of going back in time to share a meal with early American settlers.


At one point, Zach and I discussed if we could temporarily go back to one period in American history, what it would be. I am pretty sure we both decided on the drafting of the constitution. Perhaps my second choice would be the first Thanksgiving. It is not that I imagine this day to be an outrageous celebration or anything particularly extravagant. It is more about what it would mean to me as someone from the future peeking back at how it all began. And I am not going to lie; it is also about the food. I am sure the kind of food prepared straight from the land in 1621 was not the tasty, inventive and genetically-modified kind of food we enjoy today for Thanksgiving. In fact, venison and wild fowl are the only two items on the menu for the first Thanksgiving of which there are any specific records. Sometimes I just think it would be fun to go back to simpler times as far as food is concerned to see how far we have come in some ways and see how little we have learned in other ways.

This is all to say my next recipe is something that goes way back, not necessarily to the first Thanksgiving, but certainly back to what can be considered "simpler times" when it comes to food. Cottage pie is believed to have originated in northern England and was served as a hearty dish for rural workers just after the British began adding potatoes to their diets. The dish was known as shepherd's pie when the meat was made with minced lamb and cottage pie when it was made with ground beef.

This recipe includes an ingredient that I never thought I would use in anything. After making this dish for the first time a few months ago without this ingredient, I decided it was slightly bland and needed a kick. That is why this particular recipe jumped out at me when I cam across it. Blog readers, meet horseradish:


Kick in the Cottage Pie: (a Rachel Ray recipe)

5 pounds Russet potatoes, peeled and cut into chunks (you can also use small new potatoes and including the skin)
1/2 to 3/4 C milk (use more or less depending how thick you like your mashed potatoes)
1 egg, beaten
1/4 C prepared horseradish
Salt and freshly ground black pepper
2 tablespoons extra-virgin olive oil
2 pounds lean ground sirloin
1 C frozen green peas
2 carrots, peeled and chopped or sliced 1/4-inch thick
1 large onion, chopped
1 fresh bay leaf
3 tablespoons flour
2 cups beef stock
1 tablespoon Worcestershire sauce
2 to 3 tablespoons chives, chopped
Handful of breadcrumbs (optional)

Peel potatoes (optional if you have chosen to use the small red ones).


Chop the vegetables. I bought these beautiful carrots from the farmers' market in Santa Monica.


Place the potatoes in a medium-size pot, cover them with cold water and bring to a boil. Salt the water and cook potatoes until fork tender, about 12-15 minutes. Drain the potatoes and allow them to cool slightly. Mash them with the milk then stir in the egg and horseradish. Season with salt and freshly ground black pepper and set aside.

While the potatoes are cooking, make the filling: Heat the olive oil in a large, deep skillet (preferably oven safe, but it is fine if you do not have one) over medium-high heat until it shimmers. Add the meat and brown it well, about 5 minutes. Add the vegetables and bay leaf to meat, season with salt and pepper and cook until the vegetables are softened, 8-10 minutes.


Sprinkle the flour around the pan, stir and cook for about 1 minute. Add the stock and bring up to a simmer to thicken the mix, 3-4 minutes. Discard the bay leaf and season the beef mixture with Worcestershire sauce, salt and pepper.

Turn broiler on and place rack in the middle of the oven.

Transfer the filling to a large casserole or baking dish (9" X 13") and top it with heaping spoonfuls of the horseradish mashed potatoes so they completely cover it (Or just place the potato mixture on top of the meat mixture if you are using an oven-safe skillet. I like to sprinkle some breadcrumbs over top of the mashed potatoes. Brown the potatoes under the broiler, about 5 minutes.


Garnish with chives and serve.


This recipe also freezes well in a freezer-safe plastic storage container for a few weeks. One day before you are ready to eat the frozen leftovers, put them in the refrigerator to defrost and heat them up in the oven until heated all the way through.

Wednesday, June 10, 2009

Ex-Boyfriend Empanadas

There was a Coca Cola commercial a few years ago that was set in an apartment with two roommates. One of them comes home and finds a note from his mom on the counter that says, "Tony, I hope you enjoy the empanadas and coke I left for you in the fridge." Excitedly, Tony goes to look in the refrigerator as the suddenly wide-eyed roommate sits at the counter scarfing down the last bit of the tasty snack and cool beverage.
...or something like that.

For some reason, this ad really stuck with me. Unfortunately for Coca Cola, it was more about the empanadas than it was about the soda. I really wanted to look into these empanadas, which I soon learned were Latin American meat-stuffed turnovers. Delicious.

My new interest in this particular dish happened to coincide with the time a good friend of mine (who lived next door to me - apartment 301 - in college) was dating an Argentinian hunk. One afternoon, having nothing better to do (which was often the case in college life), I poked my head in good ole' apartment 301. To my delight, my friend and the Argentinian were making empanadas in her kitchen. I stood by, took mental notes, and then later tried making them on my own. I have made empanadas several times since that day. After having experimented with several techniques, ideas, and ingredients in an attempt to make them my own, I finally feel like I have found my favorite recipe for them in my last couple of batches. I am using the term, "recipe", loosely here because you can really just stuff the dough with anything you want. Things I have tried include, pork, chicken, and plain cheese.

When people break up, they take things with them from the relationship that they will carry with them forever, but so do the people around them. Well, I am taking these empanadas and so will my kids and their kids, always remembering where they came from. So since I am a big fan of combining words, please allow me to present to you:

Ex-Panadas

1 C water (room temperature) in a small bowl
1 large egg
1 lb ground beef
1 tbsp olive oil
1 C green olives (stuffed with pimiento) – chopped
1 medium white onion - chopped
2 tbsp minced garlic (or two cloves)
salt and black pepper (to taste)
2 C shredded white cheddar cheese
Kosher salt (to taste)
1 package of frozen dough - thawed (pictured below because I am not exactly sure how to explain it) You can use any kind of frozen dough including puff pastry dough (if you want more of a flaky empanada), a pie crust dough, or one that you can find in the ethnic frozen section of any major grocery store (yes, this section does exist…this is the kind of dough pictured below because it is what I prefer to use). There are generally two sizes (one is about six inches in diameter, the other is about 9). I prefer using the ones that are about 6 inches in diameter for smaller empanadas, but the bigger ones can be good if you are using them more a main dish instead of a side or an appetizer.


Heat (on high) olive oil in a large pan for 1 minute

Add the ground beef to the pan, and stir around until browned

Add the chopped onion and olives (with pimiento), salt, pepper, and minced garlic to the meat and continue cooking until onions begin to feel tender (about 3 minutes), mixing well.

Remove meat from heat and drain any excess juices or fat.

To assemble empanadas:

Beat egg in a small bowl and set aside

Place one dough round flat on a clean countertop (you may want to sprinkle a little bit of flour on the counter to keep the dough from sticking to it)

Dip your finger in the bowl or water, and neatly run it around the edges of the round of dough on only the side facing up (this is to help the edges stick together later on).

Spoon meat mixture (about two heaping tbsp) onto dough and sprinkle generously with shredded cheese. Example (without the cheese):


Fold dough, enclosing mixture in a pocket.

Seal the edges together any way you like. You can pinch the edges together to make patterns, you can fold the edges inward, or you can use a fork and press the edges together using the bottom of it to sandwich the dough between it and the counter. You just have to figure out what works best and is easiest for you. They should look something like this:


Transfer the empanadas onto a baking sheet (sprayed very lightly with cooking spray).

With a pastry brush, coat the entire surface of each empanada with the beaten egg.

Lightly sprinkle a pinch of kosher salt over each empanada.

Bake at about 375 degrees F for about 20-25 minutes (until tops are golden). Baking temperature may vary due to the kind of dough you are using, but there should be rough baking instructions on the package.


A couple of notes:

I borrowed some pictures for this post to better illustrate the process because it really is difficult to explain! However, below is a "Bite Me" original:


I like to make a bunch and freeze the leftovers. I have found the best way to store them is to wrap them individually in foil and then you can put them in freezer bags or a freezer-safe plastic storage container before putting them in the freezer (make sure they are completely cool before you freeze them). When you are ready to eat them up, just unwrap how ever many you would like to eat and put them back in the oven until they are heated all the way through. You can also put them in the microwave on high for 3 to 3 1/2 minutes (for one or two at a time).

Friday, June 5, 2009

Ballbusters

This is a tribute to Ballbusters. The following are a few that stick out in my mind as women who's accomplishments are often overlooked because of their overbearing, ballbusting qualities:

Hillary "monochromatic suit" Clinton: Whether you agree with her politics or not, this lady knows how to hold it together under certain stressful circumstances.

Kate "Jon and Kate Plus Eight" Gosselin: Some say she is a "MOMster", driving her husband into the arms of a 23 year-old schoolteacher. But, I don't want to even try to imagine where she would be without her ambition, her git-r-done personality with the kids , and a lame husband to boss around? Who knows?

Anna "The Devil Wears Prada" Wintour: She is quite possibly the most intimidating woman in the world to men and women alike, serving as the basis for the character of 'Miranda Priestly' played by Meryl Streep in the 2006 comedy, The Devil Wears Prada. Her sharp fashion sense and ability to make snap-quick decisions made her the successful editor-in-chief of American Vogue. I am tempted to crown her queen of the ballbusters, but as is in all areas of life, there will always be someone one step ahead. Sorry Anna Wintour.


Meat Ballbusters:

(based on a recipe from recipezaar.com)

This recipe makes a bunch of balls (depending on how big or small you make them). They are especially delicious when you cook them by dropping them in a nice chunky homemade tomato sauce (recipe coming soon). The flavors mix with each other when cooked slowly like that.

1 ½ lbs ground beef
1 large egg, slightly beaten
½ C grated parmesan cheese
1/3 C breadcrumbs (or use enough to hold the meat together)
1-2 tbsp fresh minced garlic (or use 1 teaspoon garlic powder or to taste)
1-2 tsp salt (or to taste, I use 2 teaspoons seasoned salt)
1 tsp fresh ground black pepper
1/3 C milk (can use up to 1/2 cup milk)
½ tsp dried oregano (optional, or to taste)
¼ C chopped fresh parsley (or 2 tablespoons dried parsley)

Mix all ingredients together in a large bowl.

Shape into small meatballs (at this point you can place on a jelly-roll/baking sheet and freeze to use later, or cover with plastic wrap refrigerate up to 24 hours before using).

Drop the meatballs into simmering pasta sauce, do not stir for at least 20 minutes or you will risk breaking the meatballs.

Continue cooking in the simmering sauce for another 20 minutes (depending on how fast your sauce is simmering 40 minutes total should fully cook the meatballs).

After the 40 minutes cooking time continue cooking your sauce with the meatballs in for as long as desired.

* you may also bake the meatballs at 350 degrees F for 25 minutes or until cooked through.

You can also serve these as an appetizer, sprinkling the balls with some fresh parmesan cheese. The ground beef mixture also makes nice juicy gourmet hamburgers. Although I would not necessarily use it for a traditional ketchup, mustard, and cheddar cheese, and bacon all-American style burger. I would probably pair a burger patty made with this meat with some asiago cheese (or another dry, aged type of cheese), sun dried tomatoes (or sun dried tomato paste), caramelized onions (or thinly sliced fresh ones), some mixed greens, and a nice fancy artisan style bun to make more of a fancy burger...if you like that sort of thing.

This is a picture of these balls in a homemade sauce (again, recipe soon to come):

Thursday, June 4, 2009

Owned.

The first time I ever had chili was from the biggest pot I have ever seen in my life.


This was in college, and Marc MacLean's parents (his mother more affectionately known as Marcia) were in town, making chili for what seemed like a small country of college students. The pot was about two feet tall with a foot and a half diameter. They served this chili over white rice with some shredded cheddar cheese sprinkled over the top. Everything about this dish made me feel all good inside, and I never thought it would be possible to recreate the level of warmth and satisfaction I could get from a bowl of anything...until I tried this recipe. I would describe this an intense recipe. It is not hard to make, but there are an insane amount of ingredients, and the preparation is very involved. The good thing about it is the leftovers (chili freezes and keeps very well for months). This recipe will make enough to feed two people at least four meals. It has a little bit of kick to it from the chili peppers so if that doesn't appeal to you, you should use less or maybe leave them out all together. So I am respectfully naming this recipe:

MARCIA'S-BIG-POT CHILI-CAN-BOW-DOWN-TO-ME CHILI:

(based on recipes from recipezaar.com)


2 tsp oil
2 onions, chopped
3 cloves garlic, minced
1 lb lean ground beef
3/4 lb beef sirloin, cubed
1 (14 1/2 ounce) can diced tomatoes OR 2 large freshly chopped tomatoes
1 can dark beer
1 C strong coffee
2 (6 ounce) cans tomato paste
1 can beef broth
1/4 C brown sugar
3 1/2 tbsp chili sauce
1 tsp cumin
1 tbsp cocoa
1 tsp oregano
1 tsp black pepper
1 tsp coriander
1 tsp salt
4 (15 ounce) cans kidney beans
3 chili peppers, chopped (Please, wear gloves when handling the chili peppers. You will thank me when you can sleep at night without feeling like your hands are on fire.)


Heat oil.
Cook onions, garlic and meat until brown.
Add tomatoes, beer, coffee, tomato paste and beef broth.
Add spices, cocoa, sugar and chili sauce.
Stir in cans of kidney beans and the chili peppers.

Transfer the whole mixture to a huge crock pot (mine is large, and it is filled to the brim). Cook on the low setting for about 8 hours.


This is ALWAYS better after being refrigerated and then eaten a day or two later. You can also freeze leftovers in freezer bags for up to a month...or two.

Tuesday, June 2, 2009

Little Plates

Tapas are delightful little plates of appetizers and are generally enjoyed by sharing several with everyone at the table, sometimes to make an entire meal. The word "tapa" means "cover", or "lid" in Spanish. The origin of of tapas is unclear to say the least, but here are a couple of the most popular theories:

*King Alfonso X of Castile liked to order his wine with a small plate or a piece of ham on top to keep flies and sand out. Eventually taverns began putting little bits of food on these small plates.

*King Alfonso X insisted that all Castilian taverns serve small plates of food with each glass of wine to ensure that patrons would not get drunk too easily.

*Tavern owners realized that serving small portions or salty meats with the sweet sherry wines made the patrons thirsty, boosting sales more than enough to make up for the cost of the meat.


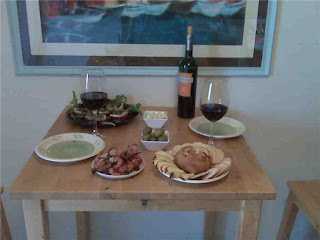
While it may (or may not) be fun to speculate what the origin of tapas is, one thing is for sure as far as I am concerned: it is fun to eat them. There are traditional dishes that are made into tapas like torilla de pata, fried calamari, olives, cheeses, serrano ham, croquettes, and patas bravas, but any food can be enjoyed in the tapas-style of eating (there is always wine involved). I made a modest assortment of tapas for a Sunday night dinner this week so these are the recipes I am sharing below:

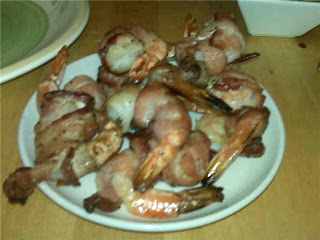
SHRIMP WRAPPED IN BACON WRAPPED IN ALL THE LOVE IN MY HEART

5 oz thinly sliced bacon (or jamon)
24 large uncooked, headless prawns, peeled
Freshly ground black pepper
1 tablespoon olive oil
2 lemons, quartered

Cut the bacon (or jamon, if using it) into pieces which will wrap generously round the prawns. Place the wrapped prawns down flat on a board and skewer them through the fattest part and the tail, making sure the bacon is firmly fixed. Season generously and drizzle with the oil.

On a high heat, griddle, grill or barbecue place the prawn and bacon skewers
for 2-3 minutes on each side, or until the bacon crisps up. Alternatively , roast in a hot oven (425ºF) on an oiled baking tray for 8-10 minutes. Squeeze over the juice of the lemon wedges and serve immediately.


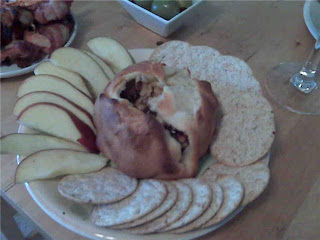
YOU BETTER BRIE READY FOR THIS

4 servings

1/2 package frozen puff pastry, thawed
1 (8 ounce) package brie cheese, round
1/8 C toasted walnuts, chopped (or whatever nut you want)
1/4 C fruit preserves

Preheat oven to 425.

Lightly grease cookie sheet.
Roll puff pastry out slightly.
Place cheese wheel on top (leave rind on).
Place preserves on top of cheese.
Place walnuts on top of preserves.
Bundle Puff Pastry up and around the cheese.
Bake for 20-25 minutes.
Let cool for five minutes.

Serve with your favorite crackers, pita chips, or whatever sounds good to you! You can also be creative with the preserves. You can switch it up if you don’t want it to be a sweet dish and use a tomato, pesto or olive mixture with pine nuts instead.


CAPRESE SALAD

For 4-5 servings

2 large tomatoes
6 oz buffalo mozzarella cheese (it should come in a package about the size/shape of a baseball)
3 tbsp olive oil
2 tbsp balsamic vinegar
1 4oz bag of mixed greens
chopped fresh basil to taste
salt and black pepper to taste

Slice tomatoes in thick-ish slices (about 1/2 inch)
Slice cheese about the same thickness as tomato slices
Place tomato slices flat on top of a light bed of mixed greens and place a slice of cheese on top of each tomato slice
Drizzle or brush the olive oil on top followed by the balsamic vinegar.
Sprinkle the fresh basil, salt and pepper to taste over top.


CATALAN BREAD

This is so easy you do not really need a recipe. It is just a staple in Spanish cuisine. You just need to cut a baguette longways down the middle, rub it down with a clove of fresh garlic, and toast it slightly. Cut a ripe, juicy tomato down the middle and squeeze it over/smear it onto the bread, rubbing it in well. Drizzle some olive oil (to taste) over the bread, followed by some sea salt (to taste). This bread goes well with Iberico ham, olives, or manchego cheese. It can also add an amazing twist to a traditional grilled manchego cheese sandwich.


Don't forget to set out some small bowls with sliced manchego cheese and whole Spanish green olives along with these little plates and a nice full-bodied red wine.

Here is What's Cooking

Those of you who know me at this point in my life, know I love to cook. Since moving to Los Angeles almost two years ago, cooking has become a way for me to stay healthy, save money, and be creative. I love to try new recipes and share the ones that work well. This blog will serve as a way for me to share recipes and the stories and experiences that go with them. I will try to include a picture of every dish because:

1. It will prove that I actually made it.
2. I will rarely try a new recipe myself without seeing a picture first.
3. I like having a reason to make dishes look pretty.

The standard for recipes I post here will be if it is something I would like to make again. I would love for any or all of you to try any or all of these dishes. Feel free to comment, let me know what you think and make any suggestions for tweaking.