Monday, February 21, 2011

If You Like It...

....then you better put a ring on it.


Sorry ladies, Zach is officially off the market. Just shy of our 5 year anniversary, we were engaged to be married after a middle-of-the-wilderness-hike proposal. He took me to the middle of the Malibu mountains to "ask some big questions", as he put it. After the big Q, we continued hiking for another six hours through beautiful waterfalls and cascading streams before reaching civilization again. He really made me work for that ring that day! We then had an amazing dinner at Pizzeria Mozza, a restaurant I have wanted to try for years. It was just the sweetest day, full of doing the extravagant version of the things we normally do every Saturday: hiking and eating out. I am very excited to share this news, and I will keep you posted on the details!

Red rock with gray stripe (how did this happen?):


My fiance with his machete:


A couple video representations of about the half-way point. Unfortunately we do not have pictures of the last quarter of the hike which is the absolute most beautiful part with tall trickling waterfalls and long flat cascading rocks. It was dark by the time we got there!:


As you can tell, Stanley was very happy to hear the news. He keeps sniffing my ring.

Friday, February 18, 2011

The Mezza

In Spain, it is tapas; in China, it is dim sum; in France, it is hors d'oeuvres; in Lebanon, it is mezza.


I love to eat this way. We like to call this type of tasting and snacking "appetizers" or as Zach's dad likes to say "appe-TEASERS". However, with the popularity of the eating-several-small-meals-instead-of-three-big-ones diet that is finding it's way into the American food culture, eating appetizers or sharing small plates for dinner has become something I now see regularly when dining out (and I do dine out quite regularly these days!). Now, I am not quite sure that this whole "several small meals" thing is something I completely buy into. I like to think people are capable of eating three meals without going overboard, maybe with a couple healthy snacks between. And when I go out for tapas, dim sum or mezza, it does not necessarily mean I will be eating less; it just means I will have the opportunity to taste more delicious plates. I will admit, this process slows me down and allows me to enjoy and appreciate each dish on another level which might ultimately lead to less of a calorie intake. It just seems like this dining method was made for people like me, you know, the people who like to"try" everything on everyone else' plate at the table after rushing through their own meals.

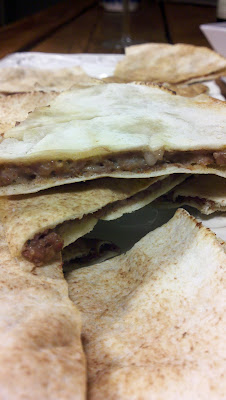
I made a mezza last weekend after we tasted a new Lebanese plate at one of our favorite Lebanese food spots in LA, Pi on Sunset. The dish was Kofta in Pita which is exactly what it sounds like: Kofta (or Kafta) in pita bread. It is like a Lebanese quesadilla (with no cheese). It was delightfully delicious so I decided to try it at home. I did cheat by buying the meat already spiced from an Armenian bakery, but I am sure this would work perfectly with any Kofta recipe.


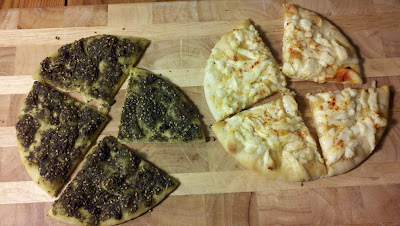
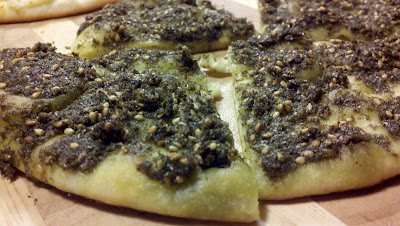
The other dish I made was something for which I hold very fond memories. When I had a chance to visit Lebanon years ago, I would go to the bakery some mornings to bake my own manakeesh. This is essentially a thinly rolled bread topped with one of a few different toppings: zaatar (a sesame/thyme spice mixture), cheese or minced lamb meat. I used to call it :Lebanese pizza" when I was little. I suppose I like to compare every dish to something that is familiar. I did not make my own dough for this version, but you certainly can if you wanted to try it. There are several recipes available online. I am fortunate enough to have several greek and Armenian bakeries close by so I was able to buy some bread on which to spread the various toppings. It is the kind of thin bread that is almost like a thick pita.

Both of these recipes are super simple, and they are a great start for a Lebanese mezza if you ever feel adventurous enough to try one.

KOFTA IN PITA
2 large pita bread rounds (between 12 and 16 inches)
1/2 pound kofta meat (recipe here)
butter (room temperature)

Preheat the oven to 350 degrees F.
Gently open the pita so that the whole inside is facing upwards...if you are using the real thing, the bread should be thin so be careful
Spread a very thin layer of butter on the inside of each half. (The butter will be on the same side of the bread as the meat).
Place half of the meat (1/4 lb) onto each of the open pitas; try to plop it around different places so it is easier to spread out.
Close the pita by folding the two halves back together.
Gently press the bread together, smashing the meat so it spreads evenly. I used a roller on the outside of the bread to flatten it even more evenly.
The pita should basically look like it did at first, but with a meat layer in the middle
Cut each pita into 6 triangles with a pizza cutter of a large sharp knife.
Place triangles onto a baking sheet lines with foil.
Bake at 350 degrees F for 5-10 minutes (until meat is cooked just all the way through.
Serve with hummus, labneh or just eat plain.


MANAKEESH

4 thick bread pitas (The kind that does not separate in the middle and is more like pizza dough. You can find these in midle eastern grocery stores, or you can use homemade or store-bought pizza dough)
1-2 tbsp zaatar (spice found in most grocery stores but definitely in middle eastern grocery shops)
4 oz Halloumi cheese (specialty cheese shops or middle eastern groceries)
good quality olive oil (I used garlic olive oil)
2 pinches of hot paprika

For manakeesh with zaatar:
Drizzle olive oil onto the bread (baked or unbaked)
mix the zaatar with olive oil. (keep adding the oil slowly and mix it until the spices turn into more of a wet paste...the consistency of mud)
Spread the zaatar thinly over the bread (use more or less to taste)
Bake at 400 degrees F for 5-10 minutes (or until bread is done and slightly toasted).


For manakeesh with cheese:
Drizzle olive oil onto the bread (baked or unbaked)
Crumble cheese and sprinkle it generously on the two pitas.
Drizzle a tad more oil over the cheese and sprinkle a pinch of hot paprika over the top
Bake at 400 degrees F for 5-10 minutes (or until bread is done and slightly toasted).

Thursday, February 10, 2011

Classy Classic Key Lime Pie

I think I like Key Lime Pie now.


I don't usually go for the fruity desserts. I prefer chocolate/vanilla/bready/cakey/creamy desserts. I made key lime pie for the first time just because I know it is one of Zach's favorites. It was definitely delicious, and well worth making. It was just not the classic version of the beloved dessert. I made key lime pie for the second time not only because it is one of Zach's favorites, but also because his mom sent me home after the holidays with a bottle of some really great key lime juice and a classic recipe.


That was half the battle, and we all know I am all about convenience. This pie was the easiest thing. It took such little effort that I had to keep re-reading the recipe to make sure I was not missing something. Granted, the recipe called for a meringue topping that would have made it more challenging. I opted to do a thick whipped topping with a tad of vanilla extract mixed in.

You are going to look twice at this recipe before asking the question, "where is the baking time?" While the recipe includes 4 egg yolks, there is no baking. Apparently,the acidity in the lime juice acts as a "cooking agent". I did have trouble with the pie setting. I just stuck it in the freezer overnight, and it was cool and delicious the next day. I looked online and a lot of people suggest just going ahead and baking it for 10 minutes at 350 degrees F to make sure it sets while other online key-lime pie purists suggest that if you bake it, it is not true key lime pie. Either way, the taste was perfect. You just need to work with the texture whether that means beating the eggs and condensed milk a little more before adding the lime juice, baking it briefly before cooling or just sticking it in the freezer for a cool refreshing treat.


Manny's Authentic Key Lime Pie (from Manny's and Isa's Kitchen in Islamorada, FL)

(recipe adapted, original recipe includes a meringue topping)

1 14 oz can Eagle Brand condensed milk
4 large egg yolks (separated from the whites)
4 oz key lime juice
1 pie crust, baked and cooled (I used an already made graham cracker crust)
1 tub whipped topping
1 tsp vanilla extract
2 key limes (for garnish)

Beat egg yolks and then add condensed milk. Mix thoroughly.
Add key lime juice and mix again.
Pour mixture onto baked and cooled pie crust.
Refrigerate pie for at least an hour (or if you would like to bake it first, bake at 350 degrees F for 10 minutes, and then refrigerate until completely cooled).
Once the pie is set, Mix vanilla extract into the whipped topping.
Spread whipped topping generously over pie.
Garnish with sliced key limes (optional).
Put back into refrigerator until ready to serve.

Note: If your pie has trouble setting, place it in the freezer for a couple hours to give it a better texture.

Tuesday, February 1, 2011

Orange Crunch Cake: Walking on Water

Zach and I were chatting creek-side on our weekend hike through Paradise Falls.


Stanley was trotting among the large rocks that were embedded in the shallow water leading up to the waterfall's large pool. He was drinking and splashing around and exploring the new world as he walked "on" the water.

All was well with the world when I heard a loud "PLUNK!". I turned back towards where Stanley had been playing, and he was gone, completely out of sight. I was in shock for a moment before his skinny little face popped out of the water, and his long lean legs started paddling. Stan had "explored" himself right into the deep water of the pool at the base of the waterfall...just walked right in!

We were all in for surprises that day. Stan must have been surprised that the ground that has always been below his paws completely vanished for a moment. Zach and I were surprised we didn't have to jump into the freezing cold water after him. He swam the few feet back to the solid ground and pulled himself back up to safety. He made "learning" to swim look like a piece of cake.


I made this cake for a family gathering during New Years. It was a simple recipe I pulled off of allrecipes.com. It is a great treat for a brand new year. It is a nice little twist on a regular ole layer cake. There is a nice orange flavor, and the deliciously surprising crunch layer adds some interesting texture. I used some homemade cream cheese frosting which turned out pretty well. However, I might try this again with a different kind of vanilla frosting with more body to it. I am just not a fan of cream cheese frosting no matter how hard I try to be.


Orange Crunch Cake

(recipe slightly adapted from allrecipes.com)

CRUNCHY, CRUMBY FILLING:
1 cup graham cracker crumbs
1/2 cup brown sugar
1/2 cup chopped walnuts
1/2 cup butter, softened

CAKE:
1 (18.25 ounce) package yellow cake mix
1/2 cup water
1/2 cup orange juice
1/3 cup vegetable oil
3 eggs
2 tablespoons grated orange zest (I used orange extract instead - read label for the measurement equivalents)

Preheat oven to 350 degrees F (175 degrees C). Grease and flour two 9 inch pans. Combine the graham cracker crumbs, brown sugar, walnuts and butter. Divide mixture evenly between the prepared pans. Set aside.
In a medium bowl, mix together the cake mix, water, orange juice and oil until blended. Beat in the eggs, one at a time, then stir in the orange zest. Pour the mixture evenly over the crunch layer in the pans.
Bake in the preheated oven for 30 minutes, or until a toothpick inserted into the center of the cake comes out clean. Allow to cool for 10 minutes, then invert onto a wire rack and cool completely before frosting. Frost (crunch side up) between layers, on top and sides. Arrange orange sections on top, then refrigerate.


Whipped Cream Cheese Frosting

(recipe from allrecipes.com)

1 (8 ounce) package cream cheese
1 cup white sugar
1/8 teaspoon salt
1 teaspoon vanilla extract
1 1/2 cups heavy whipping cream

In a small bowl beat whipping cream until stiff peaks form; set aside.
In a large bowl combine cream cheese, sugar, salt and vanilla. Beat until smooth, then fold in whipped cream.